Be ready for ballet class with these exercises
Continued! You've learned some good stretches last week. Do these next.
Last week we talked about stretches and foam rolling. This week is real talk about exercising before ballet class.
Taking ballet class is more than just a general warm up. You want to focus on working your technique throughout the class, which requires a certain level of preparation before the class starts. This requires you to fire muscles so they’re ready to go before plies even start.
The most important tip?
If you’ve been reading my newsletter or have taken my class, you can probably guess what’s most important…abs! Must do abs! Engage your abs like never before!
But don’t just do it to crunch your stomach or make yourself sweat. You see, ab exercises are like other exercises—if you do them wrong, you will hurt yourself.
So let’s do abs the right way.
What does that even mean?
Remember, abs stabilize the area around the core (a.k.a. center of gravity). When you do abdominal exercises, your whole purpose is to train your core, so that your limbs are free to move in the ball and socket joints without your spine wobbling. Or also to learn to transfer weight while using your abs (sit ups, roll ups, V balance).
There are exercises for that!
General tips:
It’s not about how you look when you do it. It is about how much you can do correctly. Please don’t just suck your stomach in and call it working abs.
Let your abs do the work, not your limbs (I’ll explain below).
Keep your movement as small and as slow as you must to keep your back still. If you can only do 25% of the movement, then that’s all you can do right now.
Use your exhale to help you engage your abs before each movement.
When you feel your abs get disengaged, exhale to engage again.
Keep your quads relaxed at all times.
Notice how your back stays still, meaning your back is not arching or moving when your legs or arms move.
Your hips should not roll with leg movements, either up and down, or sideways.
Do not point your feet! These are not exercises for your feet. Stop it.
Last but not least, keep in mind that your legs probably weigh less than your torso, so there is no need for your torso to compensate for your legs.
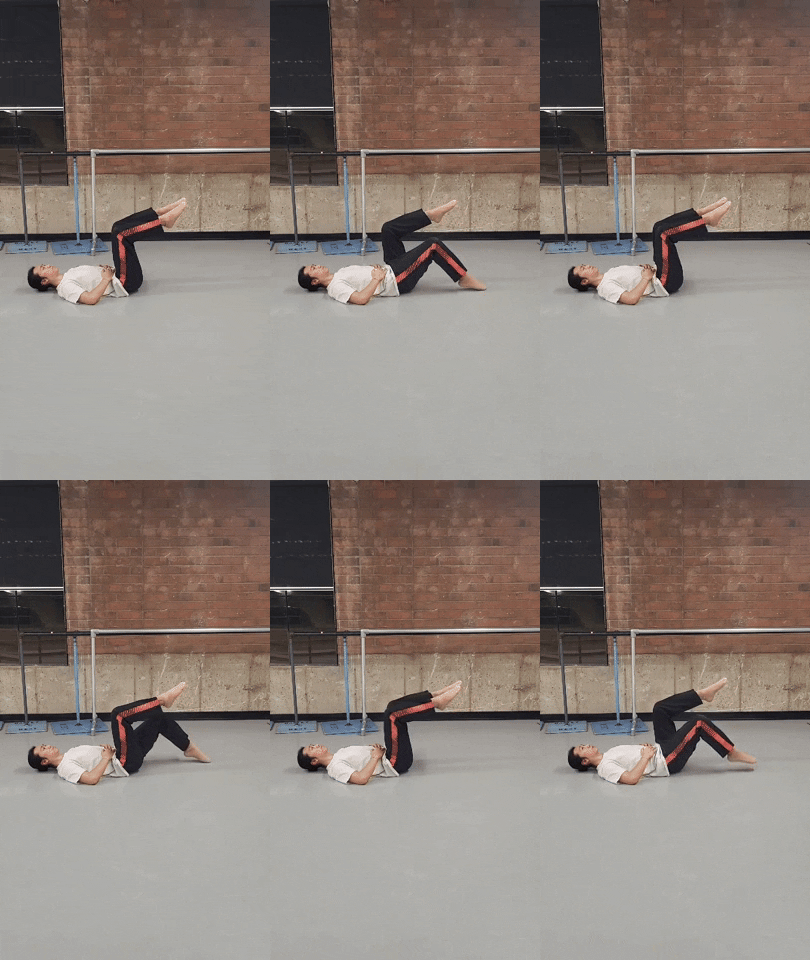
Alternating legs tap down (2 or more reps of 10 total)
Start by exhaling to engage your abs. This will put weight on top of your hip bones.
Using that engagement, slowly go into the starting position (both knees up).
Make sure not to disengage your abs as you slowly lower your legs, one at a time.
It will help to think about reengaging your abs before bringing your leg back to the starting position.
Alternating legs tap down and out (2 or more reps of 10 total)
Follow the same instructions above. You will tap your feet onto the outside of your hips.
Two legs tap down (2 reps of 10 total)
Same instructions as above. You will move both legs together.
Notice that my back stays grounded by engaging abs. Do not lose this engagement between the up and down.
Your abs should make your torso heavier and heavier as the exercise goes on.
Sit ups the right way (8 at least)
If you do it right you could do this 100 times. No joke.
Well…jokes aside, sit ups are seriously very hard if you think about lifting your body up. Too many people start by crunching the neck, or trying to pull up from the head. It creates too much tension, holds the breath, and abs actually become weak.
There is a better way. Look at the demonstration above. You want to think that your head is the extension of your upper spine, and if you move your upper spine up, then your head will follow.
So how do you lift your upper spine? You want to think about transferring your weight through your back. You want to feel like you can give pressure to the ground and push away with your back.
Note: You can see that my neck or head does not initiate the movement. Not even my arms. It is breathing into my abs that initiates what you see as I start up. My arms are not trying to pull me up. My arms are like the extension of my gaze.
Start by engaging your abs, which will increase the pressure of the mid back into the ground, which in turn will start pushing your ribs into the ground as you roll up. It’s not about pushing the ground to begin. Your abs should be an anchor, which pull you up and around until you are moving up and touching your toes. Then your abs pull your arms away and roll back to the ground vertebra by vertebra.
Important:
Start from the exhale of breath in your abs.
Do not start by lifting your head up and then thinking about abs.
Your head is an extension of your upper spine.
Do not try to pull up from your hands or even lift your chest.
Form your good habits from simple sit ups.
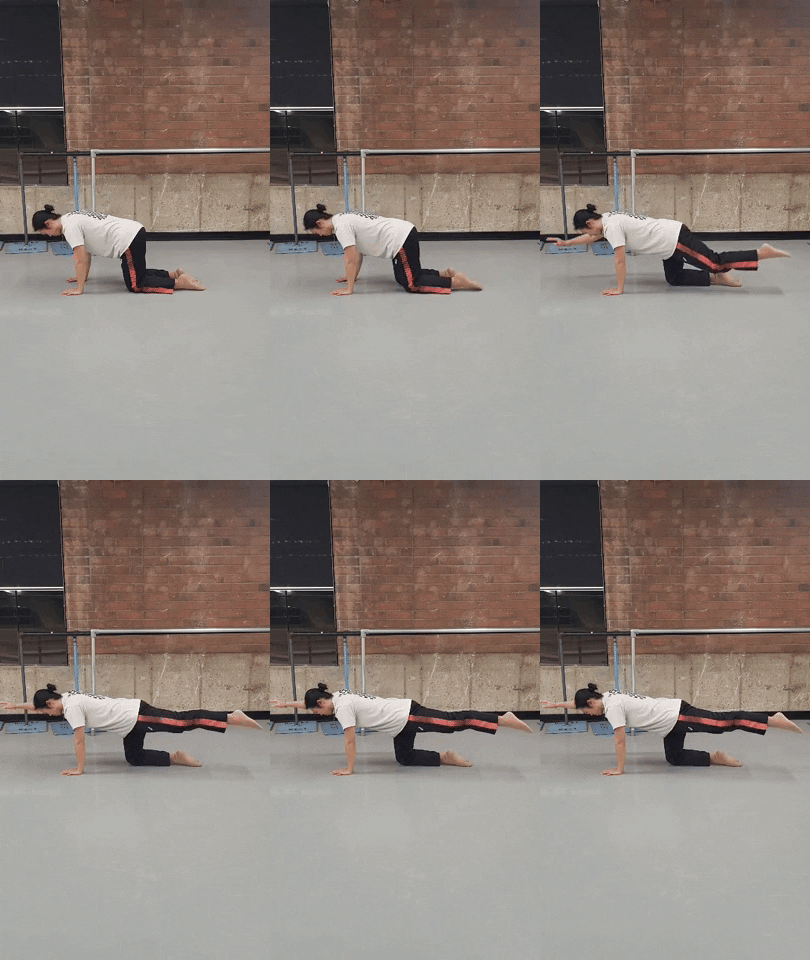
Opposite leg and arm reaches (3 reps of 10 seconds each side)
Keep the engagement of your abs. It may look like it’s a back exercise, but your focus must go to your abs! It is important to feel your abs working to stabilize your back.
As we have been practicing from exercises before, you want to separate the movement of your legs and arms from your back. And separate your neck to be the extension of your upper spine. Keep those in mind and you should find stability in this exercise.
Push-ups (shoulder-width, wide-width, shoulder-width rotated in)
This one might be guy-specific, but if you can do push ups, I’d go for it.
I remember watching my teacher instruct a guy how to do a push-up in her studio. She said, don’t do a push-up with your arms, and he laughed. He asked, “What am I supposed to do it with then?”
The answer: Your chest.
Your arms move because you engage your chest muscle (pecs). It is soooooooo important that you learn to move your arms with your pecs. Because in ballet, every port de bras comes from pecs! Even the swan arms!
How to use your pecs to get a beautiful port de bras might be a topic for another time ;)
This newsletter was jam-packed. If you got value from it, hit the like button and share with your friends. It helps me reach more people, and it might help your friends apply some new ballet ideas. If you are not sure how to do that, send me a message by replying to this email or on Instagram.
I love hearing from my readers and students!


