


Port de bras, the art of movement
Part 2: How to master moving from low fifth to first position.

Last week we talked about arm mechanics and how to engage the right muscles to go into a preparatory position (low fifth) of port de bras. This week we are going to talk about going from the preparation in low fifth to first position.
Like I mentioned in last week’s newsletter, port de bras is the carriage of arms, which is different from epaulement which means shouldering. So it is very important to separate the understanding of how you move the arms from how you move the shoulders.
If you haven’t read Part 1, learn how to start and get into your arm preparation here:
Too often our focus in ballet can turn to shaping the arms. We fixate on shaping the hands, height of the arms, and the feeling of the arms, and we never pay attention to what you actually must do to move the arms. A huge key is understanding how elbows need to initiate movement.
Think about it this way: You cannot constantly think about shaping your arms while you dance for more than a minute let alone for three hours in a full-length ballet. Not only would that be weirdly hard to coordinate, it would also be boring. You need to approach your arms with correct mechanics so that drooping hands and elbows don’t happen. Instead, your arms should naturally be supported by your pecs. Wouldn't that be nice to never have to think about holding your arms? You could think about more important things like telling the story and enjoying your variation. The secret lies in the initiation of the movement.
As a main point in last week's newsletter, rotation of the upper arms (humerus) is done by the pecs muscle. Pecs also lift the same bone up in front of our body. Additionally, I briefly mentioned the importance of separating your forearms from upper arms. Your forearms bend and rotate separately from your upper arm, and that is done by flexing your biceps. As you learn about first position and second position, both of these points are important to practice for a free and smooth port de bras.
Quick port de bras recap from last week:
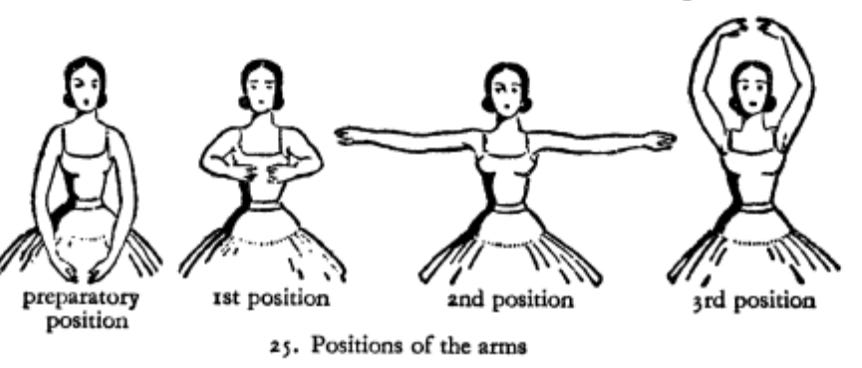
Part 1: Preparatory position, often referred as fifth low, is to have placement of arms in a dropped position. Hands facing inward are close, but not touching. Elbows are slightly rounded. And armpits are not touching.
Part 2: First position is to have arms raised in front of the body at the level of the diaphragm. Elbows are more bent than second position.
Part 3: Second position is to have arms at the side. Elbows are supported and slightly rounded, but less bent than first position. Shoulders are not drawn back or raised. Forearms are in extension of the level of elbows. Hands should not hang, but have to be held up.
Part 4: Third (or fifth high) is to have the arms raised over the head. Elbows rounded. Palms inward. Hands close, but not touching. Hands must be forward enough so that you can see them without raising your head.
Ballet Wizard is a reader-supported publication. To receive new posts and support my work, consider becoming a free or paid subscriber.
Into the first position
Remember, you have already separated your shoulders and arms going into the low fifth preparatory position. You have also rotated your humerus, which sets you up perfectly for your next move—whether you are bringing your arms to the level of your diaphragm into first position, or lifting them just barely for a little breathing of the arms in a typical preparation.
In the preparatory position, your pecs are already engaged from the rotation of your humerus. If you continuously rotate your humerus, and start to raise your elbows, you will “magically” be engaging your pecs to lift your elbow up.
I cannot stress this enough that you should never lift your arms with the shoulders. Even if you set yourself up perfectly in the preparation, if you let your shoulders go first, you will most likely not be engaging your pecs.
Practice using your chest to move arms
Sometimes focusing too much on forearms or hands can mess with the engagement of the pecs. To prevent that, dangle your forearms completely. This means that your forearms will be hanging off the humerus via elbow. 99% of the time, the movements in the forearms happen before moving the humerus, which causes the humerus to lose connection with the pecs. Pecs disengage when they gets dominated by other muscles that pull the opposite way. In this case it would be your biceps that disengage your pecs. So when you dangle the forearms, you can be sure to keep 100% of the engagement of the pecs.
So dangle your forearms so that you can focus on your pecs to move your elbows up.
This is the correct way to move your arms, which will result in looking classical.
Move your arms from low fifth to first
Alright, let’s get into the preparatory position.
Next:
From this low fifth position, you must dangle your forearms.
Keep that rotation of the humerus as you raise your elbows while dangling your forearms. Imagine now as your arms go up that they are going to cross.
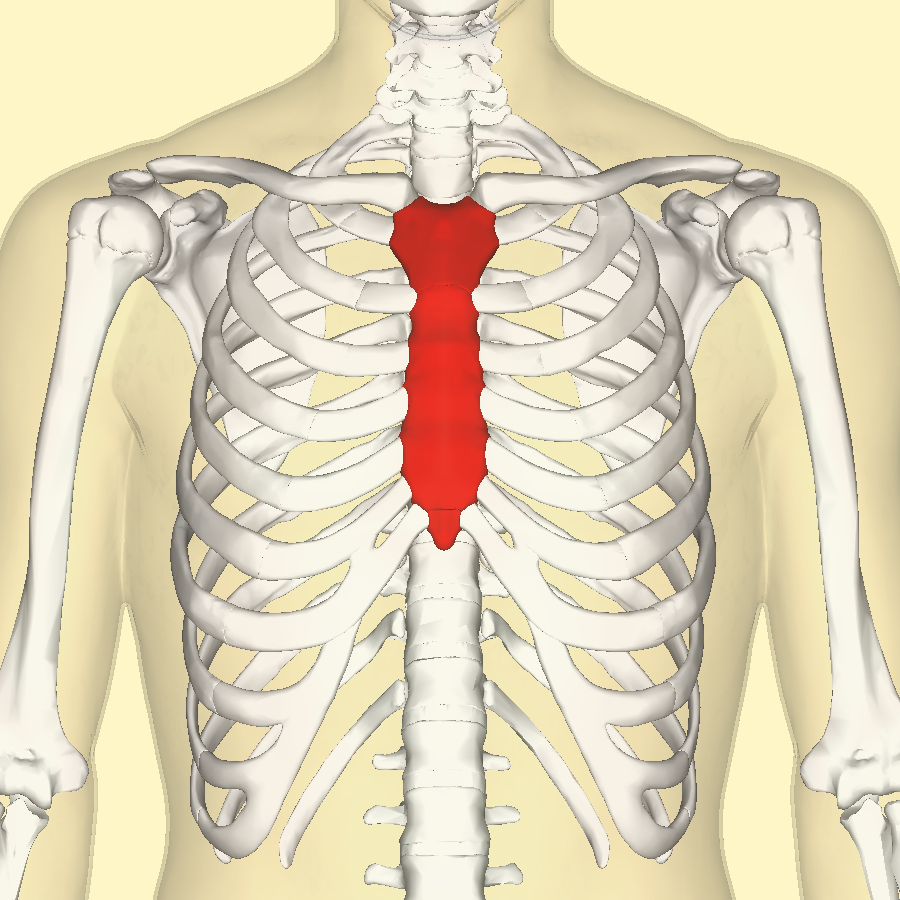
Bring your elbows slightly inwards toward your vertical center line (or towards your heart). You might feel the pecs engagement here. Have a sense that your pecs are anchored from the sternum, and focus on keeping the pecs engaged by the sternum.
Then bring your elbows out just a little, followed by turning your wrists inwards towards you so that your palms are facing you.
Adjust the length of your arms by bending or extending your elbow joints.
There! You have a perfect first position.
Watch my student, Aurora, go through the steps above. Notice how as she moves her arms, her shoulders are not tensing and lifting as she moves to first position.
Once you know how to keep your pecs engaged, then you can combine all the movements and make it smooth. Be sure to remember to engage your core, so that your back spine doesn’t arch as your arms raise, and initiate your port de bras from your elbows, instead of hands, forearms, or shoulders.
Notice her arms move separately from her shoulders. Her torso is still while arms are moving smoothly.
Can you do this bonus challenge?
With your arms in first position, can you only rotate your forearms? Also try this in second position. How far can you rotate your wrists without compensating the humerus rotation? Do you feel tightness in your biceps or perhaps in your shoulder muscles?
The reason that practicing this movement is important is that the muscle memory of the forearm movement is associated with the rotation of the humerus. Basically, if your arm tends to drop down, or your elbow points to the ground (“Don’t drop your elbows!”), it is because you have a hard time separating the forearm. Being able to do this challenge will indicate whether your biceps are tight or your shoulders are tight. If there’s tightness, you will feel restriction or a stretch while you rotate your forearms. Either the tightness doesn’t help you, or it causes your shoulders to go up.
Practice this, and if you feel the tightness in your arms, then you probably have to stretch your biceps or even your hands.
This section deserves its own article
But not yet.
Think of moving your wrists in a different way. There are two bones in your forearm that connects at your wrist, and it looks like a ball on the wrist. One is on the pinky side (head of ulna) and the other is on thumb side (end point of radius). When you are in first position, and your forearms are dangling with palms facing down, move only the pinky ball towards you to bring your palm towards you. Then move only the thumb ball towards you to bring your palm down.
You can do the same in second position. To bring your palm forward, you move the pinky side ball forward. Then move only the thumb side ball forward to face palm down.
Cool, right?
Wow, this is only a conversation about first position. I thought I would be able to talk about second position in this week’s newsletter, but you’ll have to wait.
In the meantime, enjoy your preparatory low fifth position and how you feel more freedom as you bring your arms to first position.
Like and share this post, it helps to reach other like-minded people who love ballet!
